目次
目次
はじめに
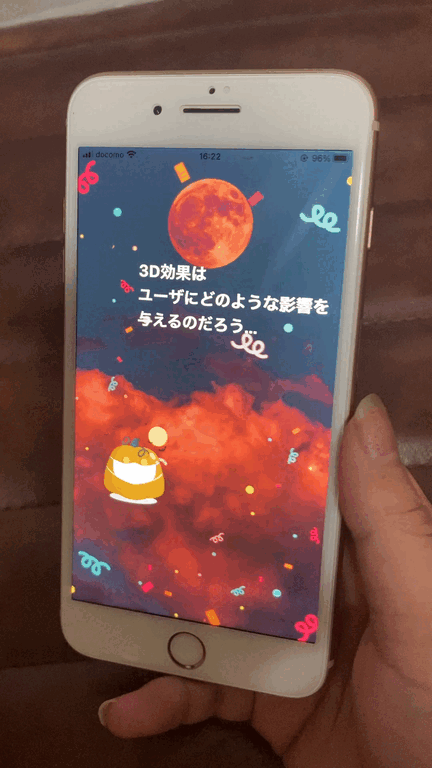
ジャイロセンサーを用いて 3D 効果を実装しました。
こちらのリポジトリで公開しています。
https://github.com/kawa1214/flutter-3d-animation-gyrosensor
どのような実装をしたか
今回は,画面を foreground,middle,background の3つのレイヤーに分けて,ジャイロセンサーに応じて移動させることで表現しました。
- 全面のレイヤーはキャラクターとエフェクトの要素です。
- 中間のレイヤーは文字です。
- 背面のレイヤーはバックグラウンド画像としました。
中間のレイヤーは固定し,全面のレイヤーはジャイロセンサーの値を元に移動しています。
背面のレイヤーは全面のレイヤーとは逆方向に移動しています。
ジャイロセンサーを Flutter で扱う
パッケージ
sensors_plus というパッケージを用いて,ネイティブからジャイロセンサーの値を取得できます。
dependencies:
flutter:
sdk: flutter
sensors_plus:
git:
url: git://github.com/kawa1214/plus_plugins.git
path: packages/sensors_plus/sensors_plus
ref: f6f69986e80573f96d7d536e09585f3e842ee270
しかしながら,sensors_plus のジャイロスコープの値を取得する間隔が,Android では 0.2 秒と遅く,iOS ではデバイスによって異なるため扱いづらいです。
今回は,どちらのデバイスでも 0.02 秒ごとに取得するように Fork してコミットを積みました。
Flutter からジャイロセンサーの値を取得する
こちらのコードで gyroscope のイベントを stream できます。
import 'package:sensors_plus/sensors_plus.dart' as sensors;
sensors.gyroscopeEvents.listen((data) => print(data));
取得できるデータは x,y,z の 3 つの値をもっており,それぞれは以下の画像に対応します。
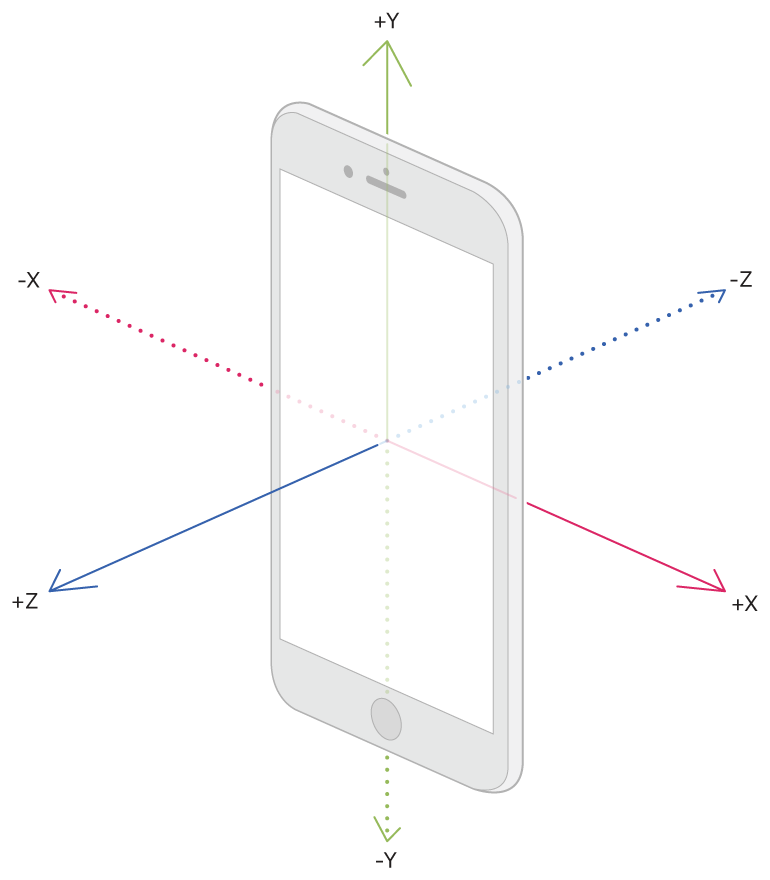
(developers.apple.com より引用)
取得したジャイロセンサーの値から,現在の位置を更新することで 3D 視覚的効果を与えます。
ジャイロセンサーの値を用いて 3D 効果を与える
最終的なコードは以下のようになります。
static const _interval = 0.02;
static const _backgroundScale = 1.2;
static const _backgroundMoveOffsetScale = 0.6;
static const _maxAngle = 120;
static const _maxForegroundMove = Offset(50, 50);
static const _inititalForegroundOffset = Offset(400, 30);
static const _inititalBackgroundOffset = Offset(0, 0);

Offset _foregroundOffset = _inititalForegroundOffset;
Offset _backgroundOffset = _inititalBackgroundOffset;
late StreamSubscription<sensors.GyroscopeEvent> _streamGyrpscopeEvent;

@override
void initState() {
    _streamGyrpscopeEvent =
        sensors.gyroscopeEvents.listen((_listenGyroscopeEvent));
    super.initState();
}

void _listenGyroscopeEvent(sensors.GyroscopeEvent event) {
    final angle = Offset(
        event.x * _interval * 180 / pi,
        event.y * _interval * 180 / pi,
    );

    if (angle.dx >= _maxAngle || angle.dy >= _maxAngle) {
        return;
    }

    final addForegroundOffset = Offset(
        angle.dx / _maxAngle * _maxForegroundMove.dx,
        angle.dy / _maxAngle * _maxForegroundMove.dy,
    );

    final newForegroundOffse = _foregroundOffset + addForegroundOffset;

    if (newForegroundOffse.dx >=
        _inititalForegroundOffset.dx + _maxForegroundMove.dx ||
        newForegroundOffse.dx <=
        _inititalForegroundOffset.dx - _maxForegroundMove.dx ||
        newForegroundOffse.dy >=
        _inititalForegroundOffset.dy + _maxForegroundMove.dy ||
        newForegroundOffse.dy <=
        _inititalForegroundOffset.dy - _maxForegroundMove.dy) {
        return;
    }

    setState(() {
        _foregroundOffset = _foregroundOffset + addForegroundOffset;
        _backgroundOffset = _backgroundOffset - addForegroundOffset*_backgroundMoveOffsetScale;
    });
}
こちらのコードを 1 つずつ見ていきます。
定数について
static const _interval = 0.02;
static const _backgroundScale = 1.2;
static const _backgroundMoveOffsetScale = 0.6;
static const _maxAngle = 120;
static const _maxForegroundMove = Offset(50, 50);
static const _inititalForegroundOffset = Offset(400, 30);
static const _inititalBackgroundOffset = Offset(0, 0);
_interval はセンサーから値を取得する間隔です。
_backgroundScale は背景画像の拡大の倍率です(foregroud layer が左右に動くと,背景も左右に移動するため,ある程度拡大をしておく必要があります)
_backgroundMoveOffsetScale は foregroud layer の動きに合わせて backgroud layer をどれくらい動かすかの値です。
_maxForegroundMove は foregroud layer を上下左右にどれくらい動かせるかの値です。
_inititalForegroundOffset と _inititalBackgroundOffset は foregroud layer と backgroud layer の初期位置です。
Offset _foregroundOffset = _inititalForegroundOffset;
Offset _backgroundOffset = _inititalBackgroundOffset;
late StreamSubscription<sensors.GyroscopeEvent> _streamGyrpscopeEvent;
_foregroundOffset と _backgroundOffset は現在の layer の位置です。
また,initState で呼ぶ gyroscope のイベントを購読する _streamGyrpscopeEvent も定義します。
initState について
@override
void initState() {
    _streamGyrpscopeEvent =
        sensors.gyroscopeEvents.listen((_listenGyroscopeEvent));
    super.initState();
}
initState では,gyroscopeEvents のイベントを listen し,listen した際は_listenGyroscopeEvent を呼ぶようにしています。
_listenGyroscopeEvent について
void _listenGyroscopeEvent(sensors.GyroscopeEvent event) {
    final angle = Offset(
        event.x _ _interval _ 180 / pi,
        event.y _ _interval _ 180 / pi,
    );

    if (angle.dx >= _maxAngle || angle.dy >= _maxAngle) {
        return;
    }

    final addForegroundOffset = Offset(
        angle.dx / _maxAngle * _maxForegroundMove.dx,
        angle.dy / _maxAngle * _maxForegroundMove.dy,
    );

    final newForegroundOffse = _foregroundOffset + addForegroundOffset;

    if (newForegroundOffse.dx >=
        _inititalForegroundOffset.dx + _maxForegroundMove.dx ||
        newForegroundOffse.dx <=
        _inititalForegroundOffset.dx - _maxForegroundMove.dx ||
        newForegroundOffse.dy >=
        _inititalForegroundOffset.dy + _maxForegroundMove.dy ||
        newForegroundOffse.dy <=
        _inititalForegroundOffset.dy - _maxForegroundMove.dy) {
        return;
    }

    setState(() {
        _foregroundOffset = _foregroundOffset + addForegroundOffset;
        _backgroundOffset = _backgroundOffset - addForegroundOffset * _backgroundMoveOffsetScale;
    });
}
若干長めに見えますが,多くの処理はしていません。
GyroscopeEvent は回転速度(rad/s)で提供されるため,回転速度 * S * 180/pi で度数法に変換しています。
final angle = Offset(
    event.x * _interval _ 180 / pi,
    event.y * _interval _ 180 / pi,
);
_maxAngle で _maxForegroundMove 分移動するということを表しています。
今回の場合では,x 軸に 120 度の回転を加えると,その軸の方向に対して 50 動くことになります。
final addForegroundOffset = Offset(
    angle.dx / _maxAngle * _maxForegroundMove.dx,
    angle.dy / _maxAngle * _maxForegroundMove.dy,
);動かしたあとの値が動かせる範囲の最大値である_maxForegroundMoveを超えていないか確認をします。
final newForegroundOffse = _foregroundOffset + addForegroundOffset;

if (newForegroundOffse.dx >=
    _inititalForegroundOffset.dx + _maxForegroundMove.dx ||
    newForegroundOffse.dx <=
    _inititalForegroundOffset.dx - _maxForegroundMove.dx ||
    newForegroundOffse.dy >=
    _inititalForegroundOffset.dy + _maxForegroundMove.dy ||
    newForegroundOffse.dy <=
    _inititalForegroundOffset.dy - _maxForegroundMove.dy) {
    return;
}
問題がない場合は,foregroudOffset,backgroudOffset を更新します。
backgroudOffsetは,foregroudOffsetとは逆方向に_backgroudMoveOffsetScaleの倍率で移動します。
setState(() {
    _foregroundOffset = _foregroundOffset + addForegroundOffset;
    _backgroundOffset =
    _backgroundOffset - addForegroundOffset * _backgroundMoveOffsetScale;
});
ジャイロセンサーの値を用いて ウィジェット を動かす
Positioned で位置を指定して動かしています。
Positioned(
    top: _foregroundOffset.dx,
    left: _foregroundOffset.dy,
    child: _buildHalloween,
)
おわりに
いかがでしたでしょうか?
今回の記事は,こちらの重力センサーと地磁気センサーを用いた Kotlin の実装を参考に,ジャイロセンサーを用いて Flutter で実装してみました。
https://juejin.cn/post/6989227733410644005
完全な実装は,こちらのリポジトリで公開しています。